This is a tutorial for beginners to the iPhone SDK and includes instructions on programatically creating a Tab Bar Controller with two Tabs and their associated views. As an illustration of how interface elements from one view can interact with those on other views I have placed a UITextField and Button on one view and a UILabel on the other. Anything typed in the text field will be copied to the label when the button is clicked. If you do now want to write all the code for the tutorial you can download it from Github.
Step 1: Read the Hello World tutorial
If you are are unfamiliar with developing in Objective C and iPhone SDK please take a moment to go through the earlier tutorial iPhone SDK Hello World. It also contains instructions on how to install Xcode and the iPhone SDK.
Step 2: Create a project
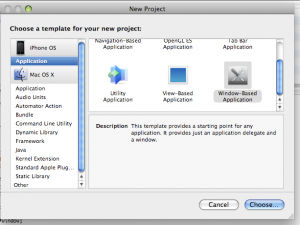
Select File > New Project or Apple Key + Shift + N to bring up the new project menu. Select the Applications item of the iPhone OS section from the menu on the left, and select Window Based Application from the icons on the right. When prompted enter a project name, I have used TabBar in the sample code. You should have two files TabBarAppDelegate.h and TabBarAppDelegate.m. (See Figure 1)
Step 3: Create the View Controllers
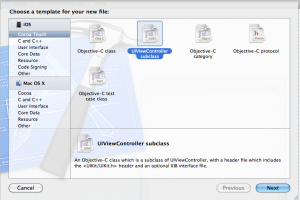
We are going to create two tabs and we need a view controller for each one. Use Ctrl + Nto bring up the new file menu and create two files of type UIViewController SubClass. I named the files View1Controller.m and View2Controller.m (See Figure 2)
Now You should have Six files in your project:
TabBarAppDelegate.m
TabBarAppDelegate.h
View1Controller.m
View1Controller.h
View2Controller.m
View3Controller.h
Step 4: Setup the View Controllers
View1Controller
First we will setup the view containing the Button and Text Field. Browse to the View1Controller.h header file and add the following interface elements, UITextField, UIButton, UIView and also add a reference to the Application delegate which will be used to communicate between views. We also create properties for each of the variables we have defined. The final code should look something like this:
#import <UIKit/UIKit.h>
#import "TabBarAppDelegate.h";

@class TabBarAppDelegate;
@interface View1Controller : UIViewController
{
     UITextField                *textField;
     UIButton                   *cmdButton;
     UIView                     *myView;
     TabBarAppDelegate          *delegateRef;
}

     @property (nonatomic, assign)    UITextField                 *textField;
     @property (nonatomic, assign)    UIButton                    *cmdButton;
     @property (nonatomic, assign)    UIView                      *myView;
     @property (nonatomic, assign)    TabBarAppDelegate           *delegateRef;
@end
In the View1Controller.m file synthesize the properties and write an init method to create the user interface elements. Technically this should be in the load view method but since I am allowing one view to directly access another. WE need them to be initialized even if they are not loaded. The proper way to do this is to store data separately and pull it when the view is loaded but i want to keep this tutorial simple.
- (id)init
{
	if (self == [super init]) {
		// Initialization code
		self.title = @"Text and Button"; //Set View title which will be displayed in Tab Bar

		// create and configure the view
		CGRect cgRct = CGRectMake(0.0, 0.0, 480, 320); //define size and position of view
		myView = [[UIView alloc] initWithFrame:cgRct]; //initilize the view
		myView.autoresizesSubviews = YES;              //allow it to tweak size of elements in view

		self.view = myView;               //set view property ov controller to the newly created view

		// create a UIButton (UIButtonTypeRoundedRect)
		cmdButton = [[UIButton buttonWithType:UIButtonTypeRoundedRect] retain];
		cmdButton.frame = CGRectMake(100, 100, 100, 50);
		[cmdButton setTitle:@"Click Me" forState:UIControlStateNormal];
		cmdButton.backgroundColor = [UIColor clearColor];
		[cmdButton addTarget:self action:@selector(action:) forControlEvents:UIControlEventTouchUpInside];
		cmdButton.adjustsImageWhenHighlighted = YES;

		//create a text field
		cgRct = CGRectMake(60, 170, 200, 50); //define size and position of textbox
		textField = [[UITextField alloc] initWithFrame:cgRct];
		textField.text = @"Enter Text Here";
		textField.borderStyle = UITextBorderStyleBezel;

		//Add text field and button to main view
		[self.view addSubview:cmdButton];
		[self.view addSubview:textField];
	}
	return self;
}
We also need to add an action handler to take care of the button click. Add the following method to View1Controller.m. We use the delegate reference to get a reference to the second view controller and the label that we will create in the second view shortly.
- (void)action:(id)sender {
	[self.textField resignFirstResponder]; //Hide Keyboard
	self.delegateRef.view2Controller.label.text = self.textField.text;//Update label
}
View2Controller
On to the second view controller, we do not keep an app delegate instance here because this view does not need to initiate any interaction with the first view. If this were not the case then we would also keep a reference here
#import <UIKit/UIKit.h>

@interface View2Controller : UIViewController
{
	UILabel    *label;
	UIView    *myView;
}

@property (nonatomic, assign)     UILabel    *label;
@property (nonatomic, assign)    UIView      *myView;

@end
In the View2Controller.m file synthesize the properties and write and init method to create the user interface elements.
@synthesize myView;
@synthesize label;

-(id)init{
	if(self == [super init])
	{
		//Initialization code
		self.title = @"Label"; //Set View title which will be displayed in Tab Bar

		//create and configure the view
		CGRect cgRct = CGRectMake(0.0, 0.0, 480, 320);
		myView = [[UIView alloc]initWithFrame:cgRct];
		myView.autoresizesSubviews = YES;
		self.view = myView;

		//create a text field
		cgRct = CGRectMake(60, 170, 200, 50); //define size and position of textbox
		label = [[UILabel alloc] initWithFrame:cgRct];
		label.text = @"Enter Text Here";

		//Add text field and button to main view
		[self.view addSubview:label];
	}
	return self;
}
Step 5: Setting Up the App Delegate
In the TabBarAppDelegate.h header file we define instances of the UITabBarController as well as the two views we have just setup. We create properties for these variables an also declare he relevant classes and import the relevant header files. The final code should look something like this:
#import <UIKit/UIKit.h>
#import "View1Controller.h"
#import "View2Controller.h"

@class TabBarViewController;
@class View1Controller;
@class View2Controller;

@interface TabBarAppDelegate : NSObject
{
    UIWindow *window;
    UITabBarController *tabBarController;
    View1Controller *view1Controller;
    View2Controller *view2Controller;
}

@property (nonatomic, assign) UIWindow *window;
@property (nonatomic, assign) UITabBarController *tabBarController;
@property (nonatomic, assign) View1Controller *view1Controller;
@property (nonatomic, assign) View2Controller *view2Controller;
@end
In the implementation file TabBarAppDelegate.m update the didFinishLaunchingWithOptions method to create the view controllers and the tab bar controllers and add them to the window. The code for this is as follows.
- (BOOL)application:(UIApplication *)application didFinishLaunchingWithOptions:(NSDictionary *)launchOptions
{
    // Override point for customization after application launch.
    //Initialize objects
    tabBarController = [[UITabBarController alloc] init];
    view1Controller = [[View1Controller alloc] init];
    view2Controller = [[View2Controller alloc] init];

    //Add a reference to self in the View1Controller so that it can reference View2Controller via this object
    view1Controller.delegateRef = self;

    //Add views to the TabBar
    tabBarController.viewControllers = [NSArray arrayWithObjects:view1Controller, view2Controller, nil];

    //Add tabbar to window and display
    [window addSubview:tabBarController.view];
    [window makeKeyAndVisible];

    return YES;

}
Step 6: Build and Go
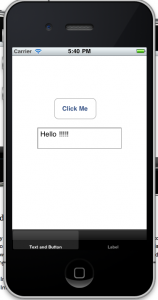
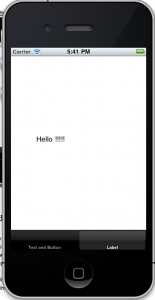
Click the Build an Go button to run your code and you should see the Tab Bar with the first view Loaded. Enter your text and click the button on the screen. Now load the second view by clicking the right Tab and see your text updated there.