This is a tutorial for beginners to the iPhone SDK and includes instructions on creating a basic HelloWorld program. The program demonstrates the use of Views, Labels and UIButtons. I will be using the 4.3 SDK so some features may not be available in the earlier version.
Source Code
Step 1: Download Xcode and the SDK
The first thing we need to do is to download the development tools namely XCode and the SDK. To download either of these you will need to register for the Apple ID and Apple developer Connection (ADC). Install both these tools, the procedure to do so is fairly trivial so I am not going into details.
Step 2: Create a new Project
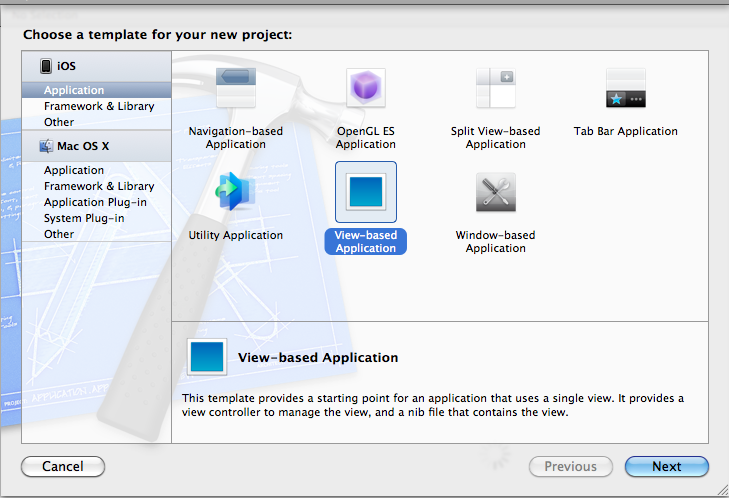
Now we have the tools we need to start coding but before we do we need to create a new project. Select File > New Project or Apple Key + Shift + N to bring up the new project menu. Select the Applications item of the iPhone OS section from the menu on the left, and select View Based Application from the icons on the right. When prompted enter a project name, I have used HelloWorld in the sample code.
Step: 3 Update the settings
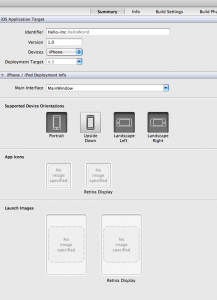
Once you compete the wizard creates the project you will be taken to the main settings page. Here you can setup the device orientation settings and the application icon. (By dragging a properly sized png file into the correct box).
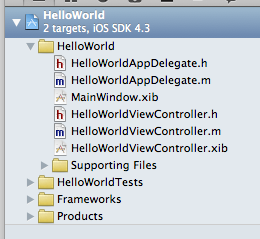
When you create a project you will see a window similar to the one shown in the image on the right. There are four source files in the package;
HelloWorldAppDelegate.h
HelloWorldAppDelegate.m
HelloWorldViewController.h
HelloWorldViewController.m
I am ignoring the xib files for now because for this tutorial I will be adding the interface elements directly and not through the interface builder. I would like to highlight some important parts of the auto-generated code so open the HelloWorldAppDelegate.h file and note that it contains a reference to a UIWindow object (Line 17) which controls all the user interaction for this application and will manage all other interface components. It also contains a reference to HelloWorldViewController (Line 19) which we will see later manages our one sample view.
In the source file for the application delegate (HelloWorldAppDelegate.m) we find an auto generated applicationDidFinishLaunching method. This, as the name suggests, invoked when the application has been loaded and in this method we will add our HelloWorldViewController object to the UIWindow and make it visible.
self.window.rootViewController = self.viewController;
[self.window makeKeyAndVisible];
The iPhone SDK UI follows the Model View Controller (MVC) design pattern and hence each view has a corresponding View Controller Object. XCode has automatically created a view for us, (its defined in the HelloWorldViewController.xib file you can see it by double clicking it in the side menu) and linked it to HelloWorldViewController. We now need to add controls to the view handle the generated events. Note we can add controls via a GUI interface called the Interface Builder but I am using the programmatic way for this tutorial.
Step 3: Adding Controls and Handler to header file
Open the HelloWorldViewController.h file and add declarations for a button, a label and a view within the curly braces delimiting the HelloWorldViewController interface declaration add the following lines.
IBOutlet UIButton *button;
IBOutlet UILabel *label;
IBOutlet UIView *myView;
We are defining a view to display a button and label to go in the view. After the curly braces add a method declaration to accept the click event of the button and also properties to access the UI elements; myButton, myLabel and myView. Also add properties for these Your entire code should look something like this:
//
//  HelloWorldViewController.h
//  HelloWorld
//

#import <UIKit/UIKit.h>

	@interface HelloWorldViewController : UIViewController {

	 	IBOutlet UIButton *button;
		IBOutlet UILabel *label;
		IBOutlet UIView *myView;
	}

	-(IBAction)handleEvent:(id)sender;

	@property (nonatomic, retain) IBOutlet UIButton *button;
	@property (nonatomic, retain) IBOutlet UILabel *label;
	@property (nonatomic, retain) IBOutlet UIView *myView;

	@end
Step 4: Adding Controls
Add a synthesize call for each of the three UI elements to create the getter and setters after the @implementation HelloWorldViewController line in the HelloWorldViewController.m file as shown below.
	@synthesize button;
	@synthesize label;
	@synthesize myView;
Now find the comment saying "Implement loadView if you want to create a view hierarchy programmatically." and un-comment the loadView method that follows this line. Add the following lines to the method to create a button and label;
	@synthesize button;
	- (void)loadView
	{
	//create and configure the view
	//define size and position of view
	CGRect cgRct = CGRectMake(0.0, 0.0, 480, 320);

	//initialize the view
	myView = [[UIView alloc] initWithFrame:cgRct];
	//allow it to tweak size of elements in view

	myView.autoresizesSubviews = YES;
	self.view = myView;

	// create a UIButton (UIButtonTypeRoundedRect) and play
	// arround with settings
	button = [UIButton buttonWithType:UIButtonTypeRoundedRect];

	// size and position of button
	button.frame = CGRectMake(100, 100, 100, 50);
	[button setTitle:@"Add" forState:UIControlStateNormal];
	button.backgroundColor = [UIColor clearColor];
	button.adjustsImageWhenHighlighted = YES;

	//Add action handler and set current class as target
	[button addTarget:self
               action:@selector(action:)
     forControlEvents:UIControlEventTouchUpInside];

    //Display Button
	[self.view addSubview:button];

    //create a label
    //define size and position of label
    cgRct = CGRectMake(100, 170, 100, 50);
    label = [[UILabel alloc] initWithFrame:cgRct];
    label.text = @"Hello World";

    //Display Label
    [self.view addSubview:label];
}
Click the Run button to check your interface is drawn correctly It should look something like to screen shot below.

Step 5: Handling Actions
We have already told the button to send an event (action) to the current class (self) in case of an UIControlEventTouchUpInside event but there is no handler defined to accept the event. We define a handler method in the class by adding the method shown below. It is doing two things, changing the text property of the label and adding a message to the log file.
    -(void)action:(id)sender
    {
        NSLog(@"UIButton was clicked");
        label.text = @"Bye World";
    }
Now click the Build and Go button again and click the button. The text of the label should change.