My team at EA loves Graphite, and as a rule, all services we write must be instrumented to report metrics to Graphite. We rely on the excellent Codahale metrics library for all Java projects. Reporting metrics to Graphite is only the first step. To enable round-the-clock monitoring and incident detection, monitors are set up which are triggered when certain criteria are met. For example, when the 95th percetile response time exceeds a pre-defined threshold. For such incidents, an email is sent and an incident is created with PagerDuty. So far we have been using Seyren for alerting. The good thing about Seyren is it’s straightforward dashboard for setting up alerts on Graphite metrics. Unfortunately, Seyren has a lot of stability issues which makes it less than ideal for production use. We ended up spending quite a bit of time automating Seyren deployments for game teams and found ourselves fire fighting often when Seyren crashed or stopped triggering alerts or when MongoDB process died.
Meet Rearview
Recently folks at LivingSocial open-sourced Rearview: a framework for alerting on Graphite metrics in real-time. Although, the documentation is little sparse, it was easy to set up Rearview in parallel to our production instance of Seyren. And after a couple of weeks of side-by-side comparison with Seyren, I’m happy to report that Rearview has worked well without any stability issues or missed alerts. To share the love, in this article I’m going to outline the process of setting up Rearview on an EC2 instance with Amazon RDS and SES.
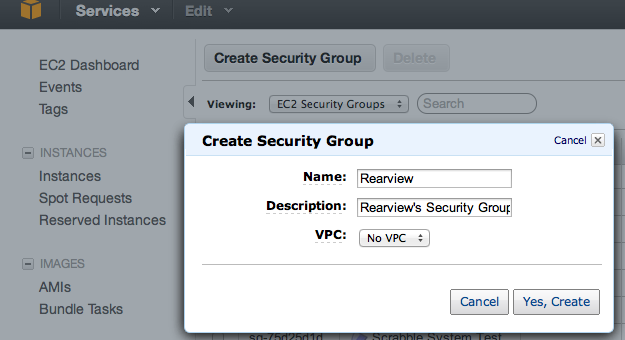
Step 1: Creating a Security Group in Amazon
We start by creating a security group for Rearview which we’ll later use for the Rearview EC2 instance. Log into AWS console, select EC2 from services and Security Groups from the left menu. Create a new security group for Rearview.
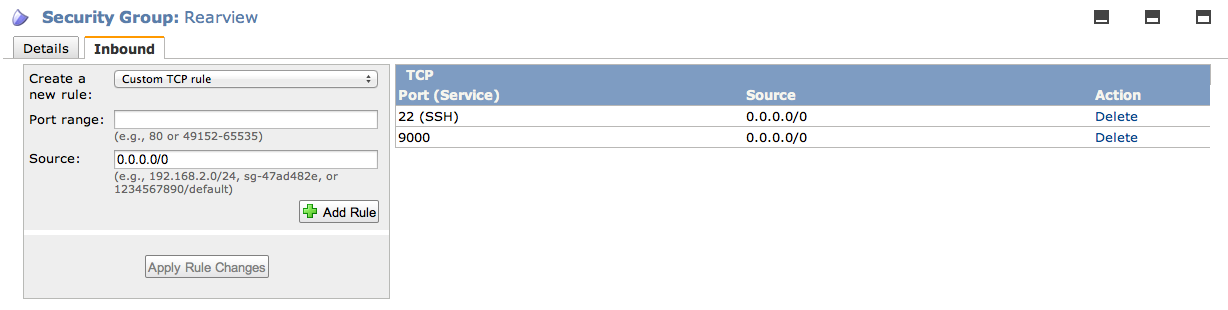
Add rule for SSH and allow public access to port 9000 (the default port for Rearview). If you want, you can restrict access to port 9000 by specifying an ip range. Here’s what the rules look like:
Step 2: Launch an EC2 instance
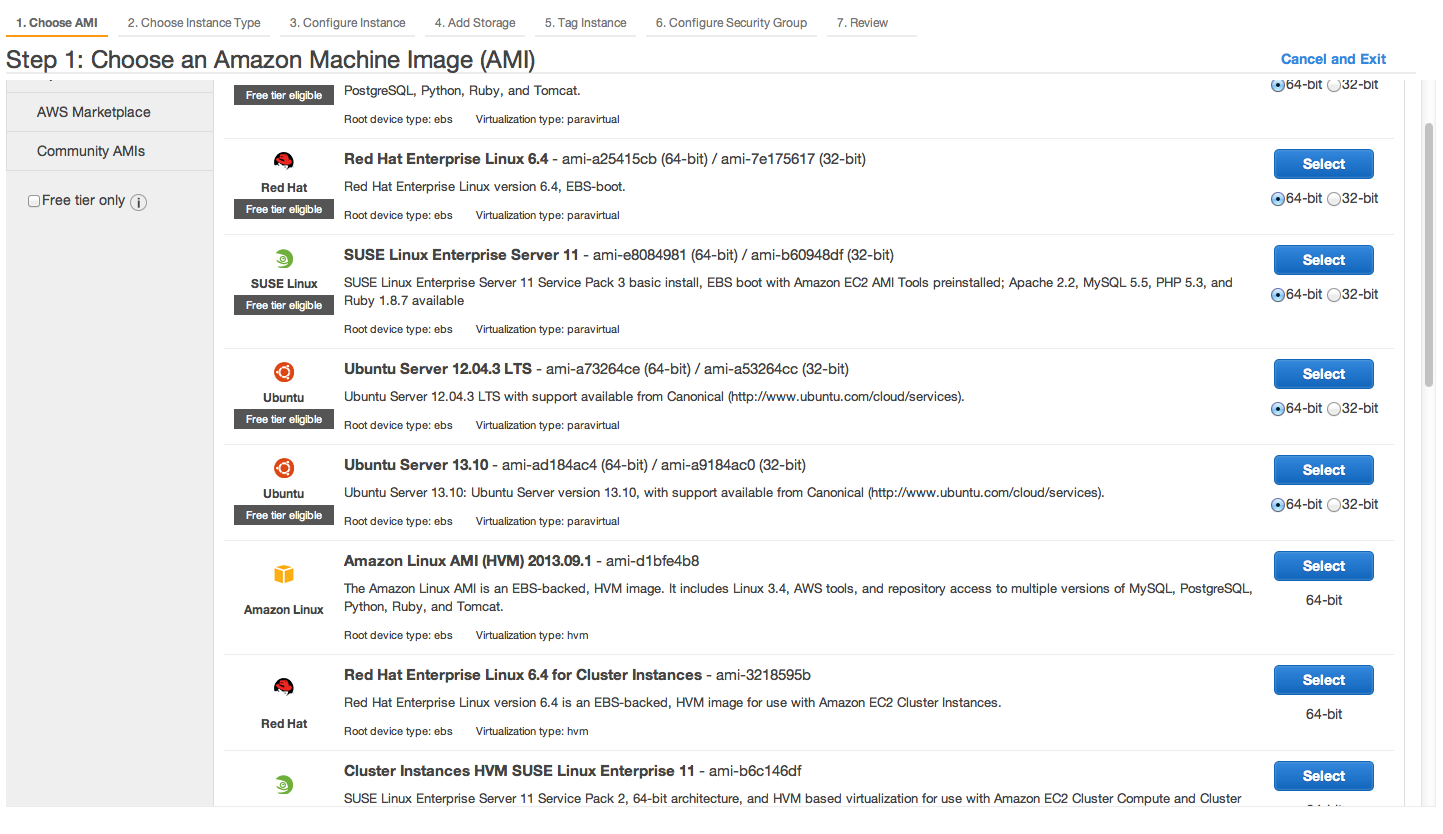
Next we launch a new instance by clicking Launch New Instance from the EC2 menu. I picked Ubunto Server 12.04 LTS - ami-a73264ce (64-bit):
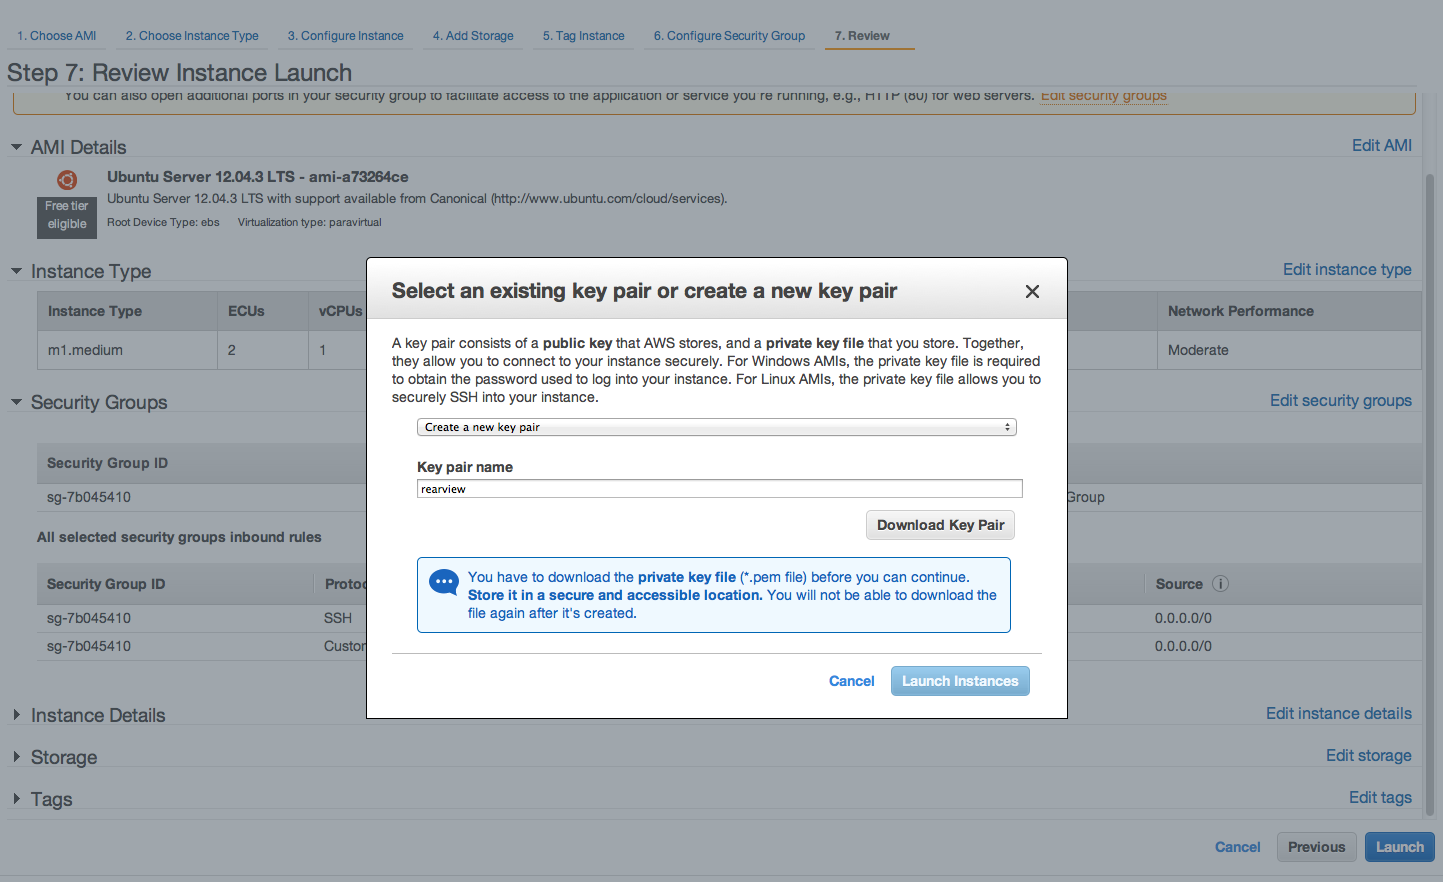
Select the instance type. Medium general purpose instance would be a reasonable choice. Continue with the setup and remember to select “Rearview” as the security group in “Step 6: Configure Security Group”. Review the setup and launch the instance. It will prompt you to create a key pair. Create a new one for Rearview. Download the key pair and don’t lose it, you will need the key to SSH into your instance.
Step 3: Install Software
Next we ssh into our instance and install a bunch of dependencies:
1
2
3
4
5
6
7
8
9
10
11
12
13
14
15
16
17
18
19
20
21
22
23
24
25
26
27
28
29	#set permissions for rearview key
	chmod 400 rearview.pem

	ssh -i rearview.pem ubuntu@ec2-xx-yyy-zzz-tt.compute-1.amazonaws.com

	#Update the package list since the AMI is quite old
	sudo apt-get update

	#Install make:
	sudo apt-get install make

	#Ant and Ivy:
	sudo apt-get install ant ant-doc ant-optional
	sudo apt-get install ivy ivy-doc

	#Java JDK & JRE:
	sudo apt-get install openjdk-6-jdk openjdk-6-jre-headless openjdk-6-jre-lib

	#Ruby:
	sudo apt-get install ruby1.9.1-full

	#JSON ruby gem
	sudo gem install json

	#Git:
	sudo apt-get install git

	#Screen
	sudo apt-get install screen
It is considered best practice to first install Ruby Version Manager (RVM) and use RVM to install rubies. Since, we only plan to use the instance for Rearview, I’m going to bypass that step. Lastly, we install MySQL, setup a local database for running tests:
1
2
3
4
5
6
7
8
9
10
11	#Install MySQL client and server:
	sudo apt-get install mysql-client mysql-server

	#specify the root user's password when prompted

	#Create the database used for tests. We'll create the production database in RDS
	mysql -u root -p

	create database rearview_test;

	exit;
Step 4: Get Rearview and run tests
1
2
3
4	#Get rearview:
	git clone git://github.com/livingsocial/rearview.git

	cd rearview
In conf/common.conf set the username and password for the database. Don’t modify the database url.
1
2
3
4
5
6
7
8
9	# Database configuration
	# ~~~~~
	# You can declare as many datasources as you want.
	# By convention, the default datasource is named `default`
	#
	db.default.driver="com.mysql.jdbc.Driver"
	db.default.url="jdbc:mysql://localhost:3306/rearview"
	db.default.user="root"
	db.default.password="ROOT_USER_PASS"
We are now ready to run the tests and verify that everything is in order:
1
./sbt test
It will download a bunch of dependencies and run tests. This step would take a few minutes. If all is well and Rearview can connect to the local “rearview_test” database, you will see output indicating that all tests passed.
Note: This would be a good time to create an AMI with all dependencies and Rearview installed. Remember to remove any unwanted ssh keys before creating an AMI.
Step 5: Set up RDS and production Rearview database
The easiest approach for setting up Rearview would involve creating the production “rearview” database on the same EC2 instance. The setup is not fault-tolerant as we’ll lose all monitors and applications if the instance goes down for some reason. One approach is to use EBS backed instances and mount the EBS volume to restore data if the instance is terminated for some reason. I much prefer setting it up with RDS with automatic daily backups turned on. That way even if the instance goes down, we can launch another one without manually trying to restore data from EBS volumes.
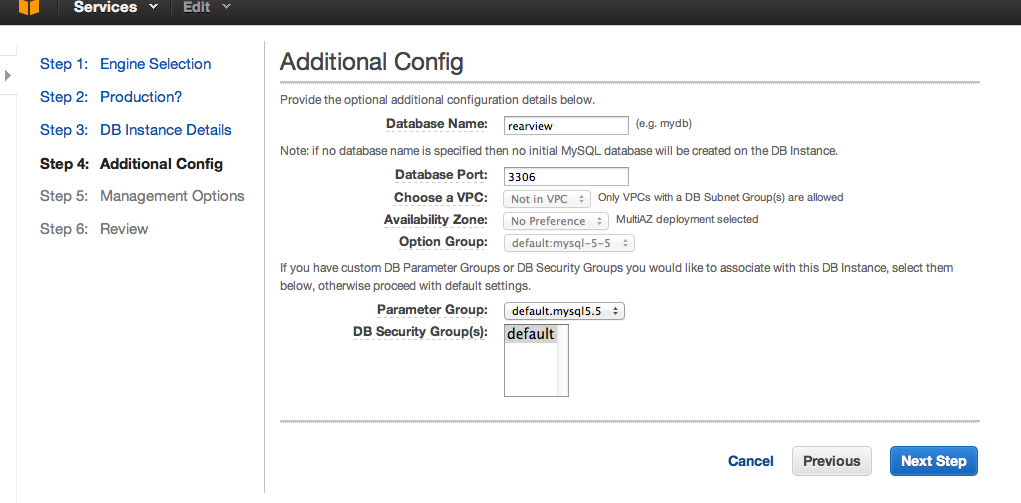
With that being said, let’s launch an “RDS” instance. In AWS console, from services select “RDS” and click launch a DB instance and select “MySQL”. Select instance type and set master user credentials.
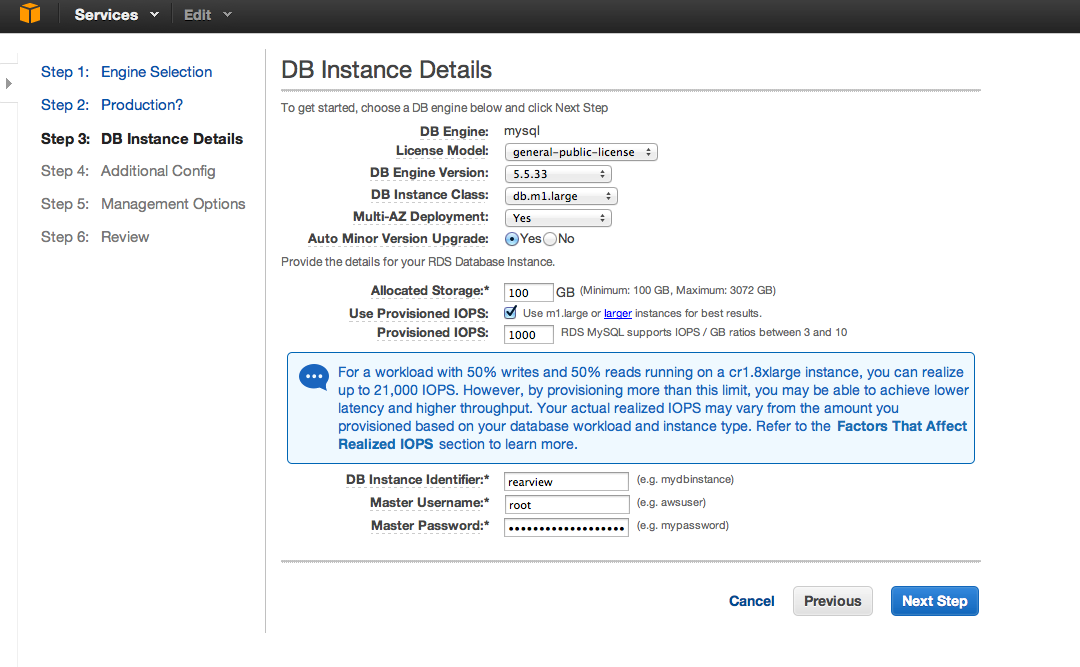
Next we set the default database as “rearview”, select the default DB security group, review and launch the instance.
Update the default DB security group and add rule:
CIDR/IP: 0.0.0.0/0
Wait for the database instance to launch and test connectivity using MySQL client or MySQL Workbench.
Step 6: Set up SES for sending emails
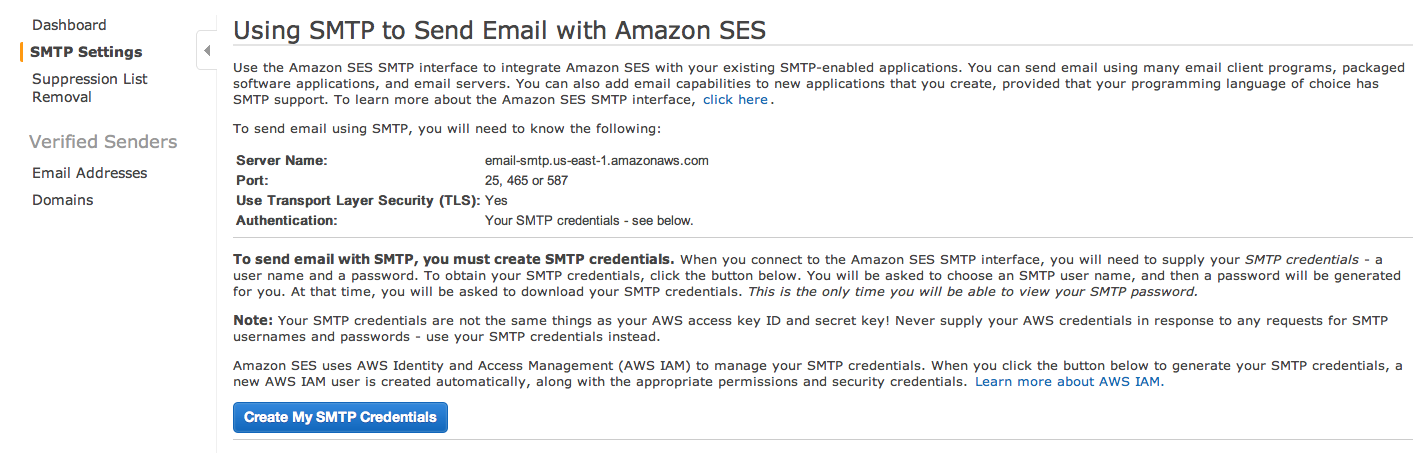
For sending out email alerts we next set up Amazon SES. From services select “SES”, then select verified senders and add a new verified sender. We’ll be using this email for Rearview to send out alerts. Next up, select SMTP settings and click “Create My SMTP credentials”. It will prompt you to create a new IAM user for SES. Create the IAM user and download the credentials:
Step 7: Configure Rearview
As a last step we need to configure Rearview before we can run it in production. Update the following properties in conf/common.conf:
- Point to RDS:
1
2
3
4	db.default.driver="com.mysql.jdbc.Driver"
	db.default.url="jdbc:mysql://XXXXX.YYYY.us-east-1.rds.amazonaws.com:3306/rearview"
	db.default.user="root"
	db.default.password="PASSWARD"
- Set Google openId domain:
1
sopenid.domain="ea.com"
- Disable statsd:
1
2	#You can install statsd on the EC2 instance and enable it if you like
	statsd.enabled=false
- Graphite properties:
1
2
3
4
5
6
7
8
9
10	graphite.host="https://your_graphite_host/"

	#if your graphite instance is not password protected, leave auth as "".

	graphite.auth="AUTH"

	#where AUTH = base64(username + ":" + password)

	#so for example if your username = "user" and password = "pass"
	#AUTH=base64("user:pass") => "dXNlcjpwYXNz"
- Email properties:
1
2
3
4
5
6	email.from="bilal@ea.com"
	email.host="email-smtp.us-east-1.amazonaws.com"
	email.port=25
	# set the username and password you got for the SES IAM use in Step 6
	email.user="USER_NAME"
	email.password="PASSWORD"
- Update service.hostname:
1
service.hostname="your-rearview-hostname:9000"
- Enable email alerts:
1
alert.class_names = ["rearview.alert.LiveEmailAlert"]
Step 8: Start Rearview in Screen
Finally, the wait is over and we can start Rearview. We are going to run Rearview in a screen session to ensure that the Rearview process keeps running after our ssh session ends:
1
2
3
4
5
6
7
8
9	screen
	./sbt start
	# CTRL+d to exit logging mode once everything is working
	# detach from screen: CTRL+A and then d

	#Re-attaching to a screen session:

	#screen -ls to list all screen sessions and then
	#screen -r <session> to re-attach
At this point you have a production instance of Rearview running with Amazon RDS and you are all setup to create new applications and monitors.